
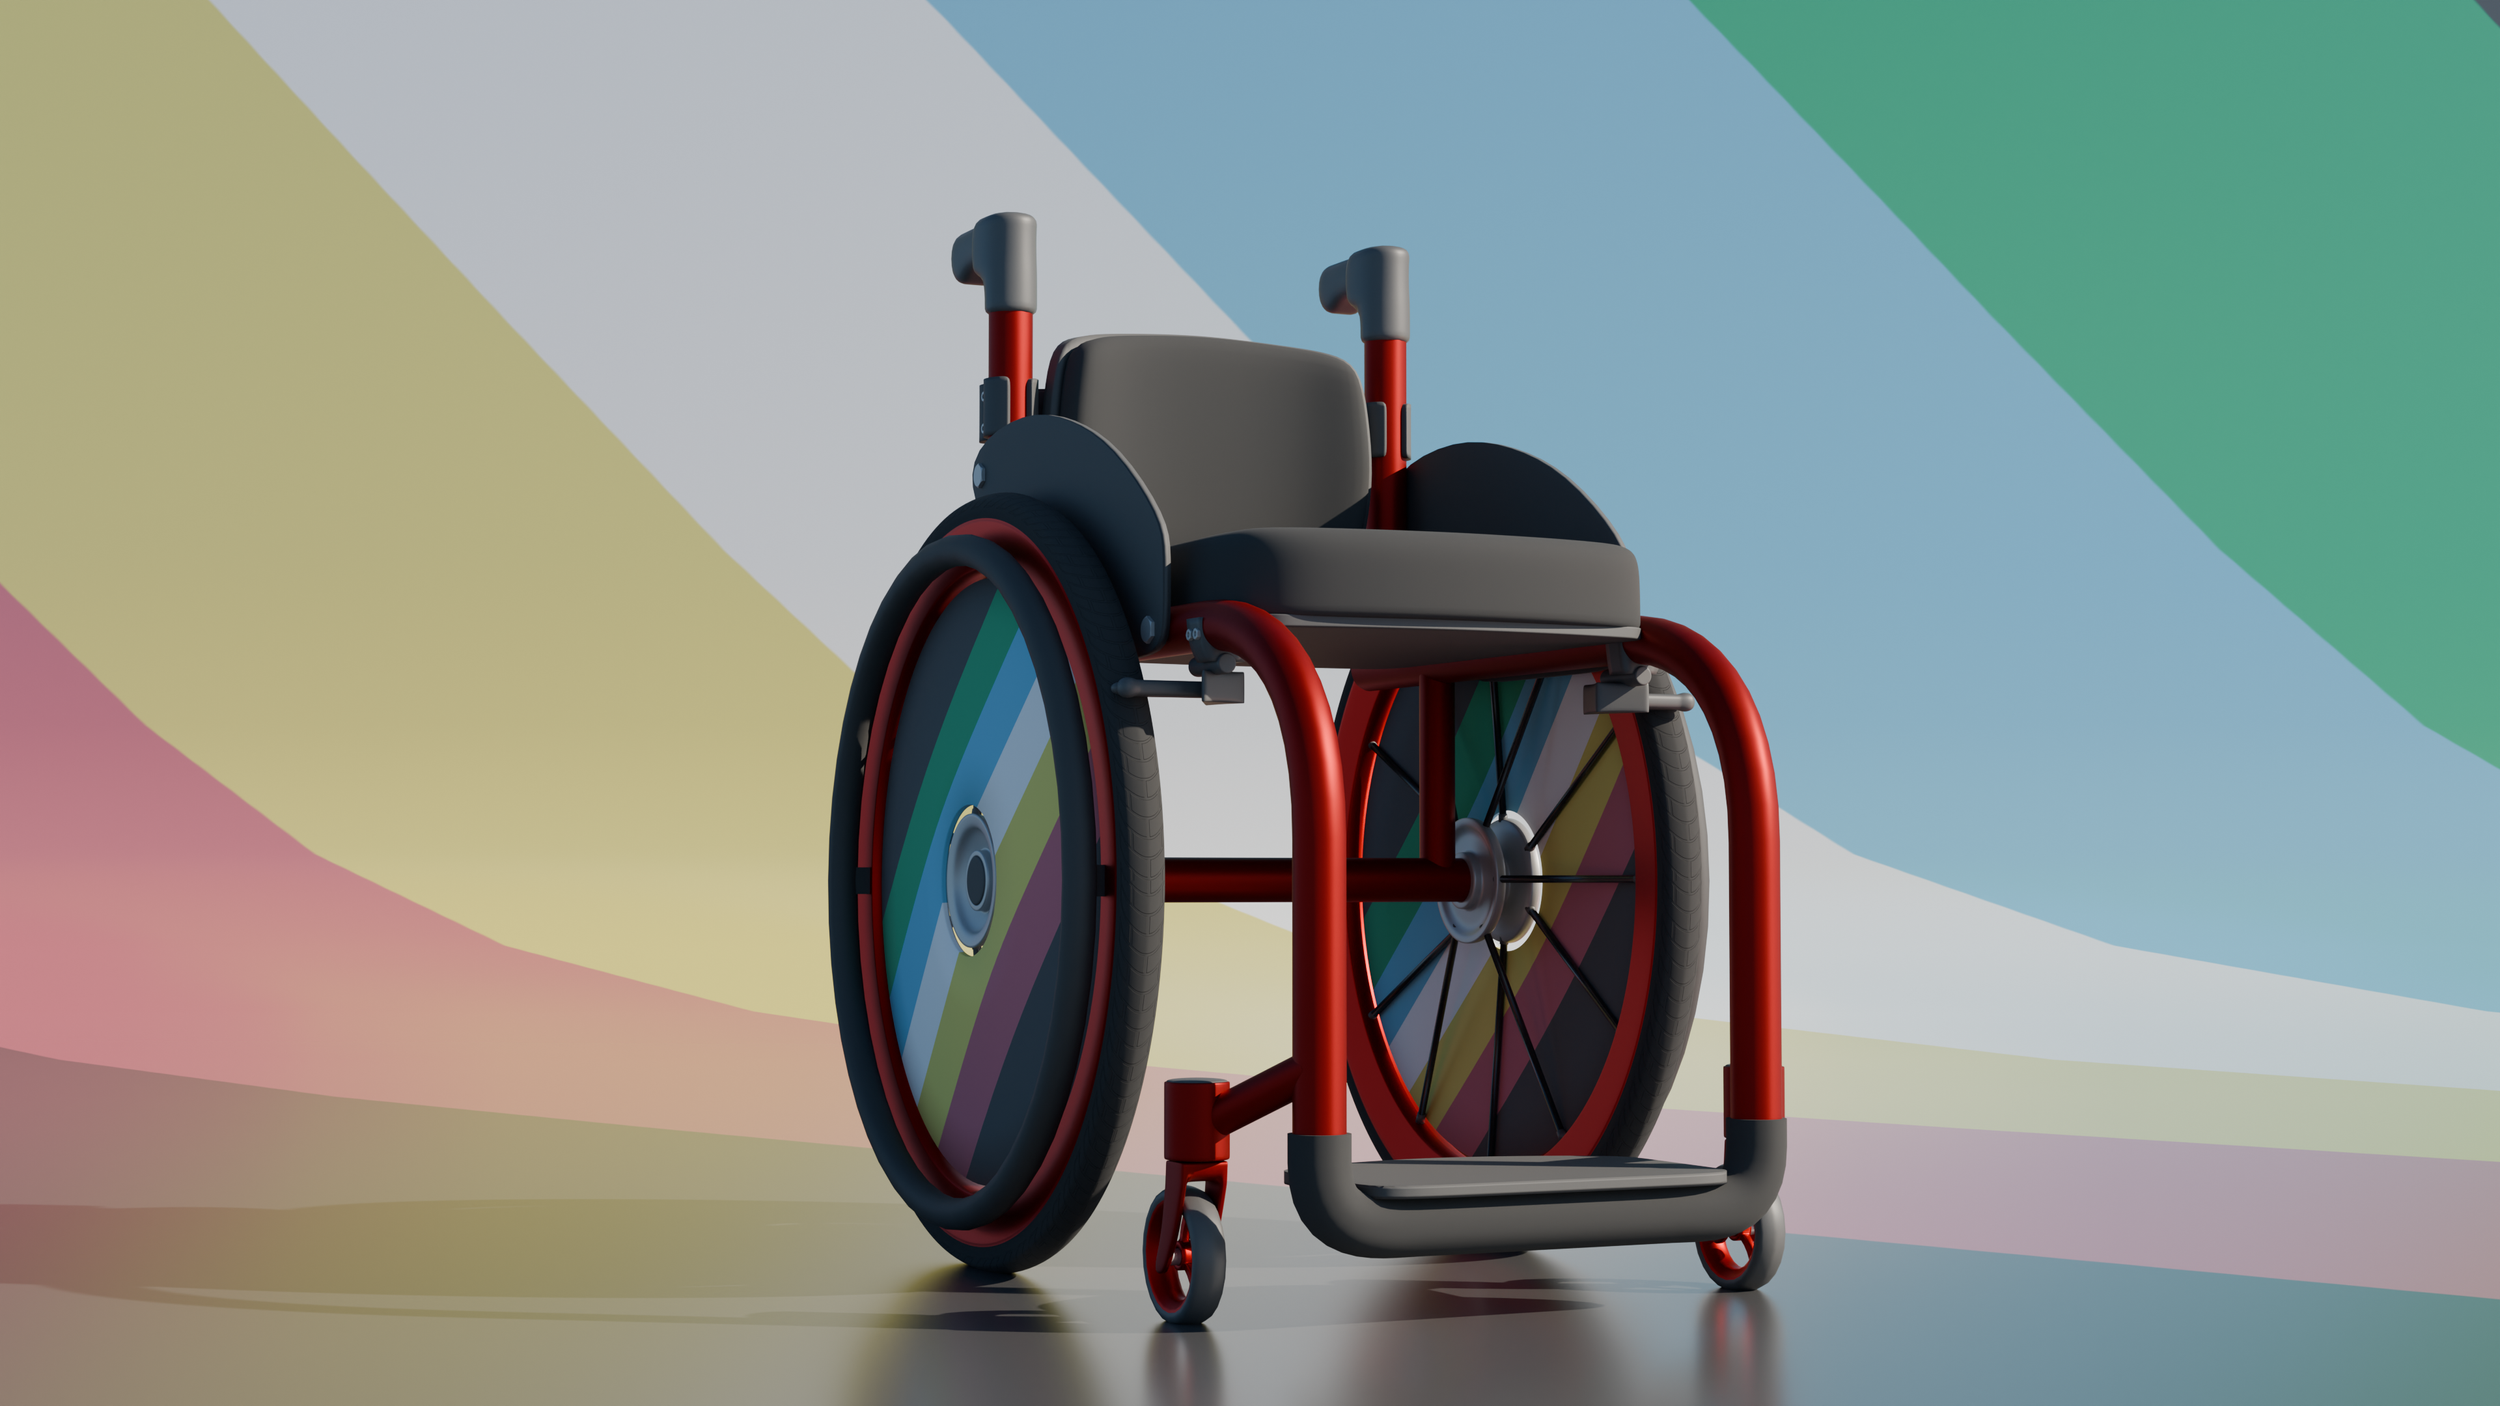
Adjustable Wheelchair Model
User Guide
Version 1.0
Thanks for downloading my Adjustable Wheelchair Model!
In real life, many long-term wheelchair users will have their wheelchairs made to fit them, so the shape and structure is determined not just by someone’s measurements, but by their disability and specific personal needs. This style of wheelchair is called an “active chair” and I think this is part of the reason why it’s so hard to find good reference material or existing assets for them. Unlike mass-produced/hospital style chairs, there is no “one-size-fits-all” approach, which is why my previous pack included so many different styles.
I hope this model can help bridge that gap though, as it is designed to be adjustable to suite a wider range of body types and disabilities than any individual static model would be able to cater to, and I hope to add more features to it in the future to increase it’s usability even further.
The Zip file includes:
A link to this page
A .Blend file
An OBJ file of the default chair settings
A textures folder that includes:
An over-writable texture file for the spoke cover, which can be replaced with any image if you don’t like the default one
(just copy and paste the file name so Blender replaces it when you open the file)Templates explaining how to make your own custom spoke cover texture, in both .clip and .psd files
an environment (skybox) texture for better lighting in Blender’s Render view (and a .txt file with the attribution info)
Table of Contents:
Using the .Blend File
Once you have Blender downloaded, (You can get it for free here) you can do pretty much whatever you’d like with the model, but here are some simple edits you can make if you’re not very familiar with Blender. I’ve tried to make as easy as possible for new users, but if you’ve never used blender before, the first 10 minutes of this tutorial will teach you everything you need to know to use this files.
Rig Overview
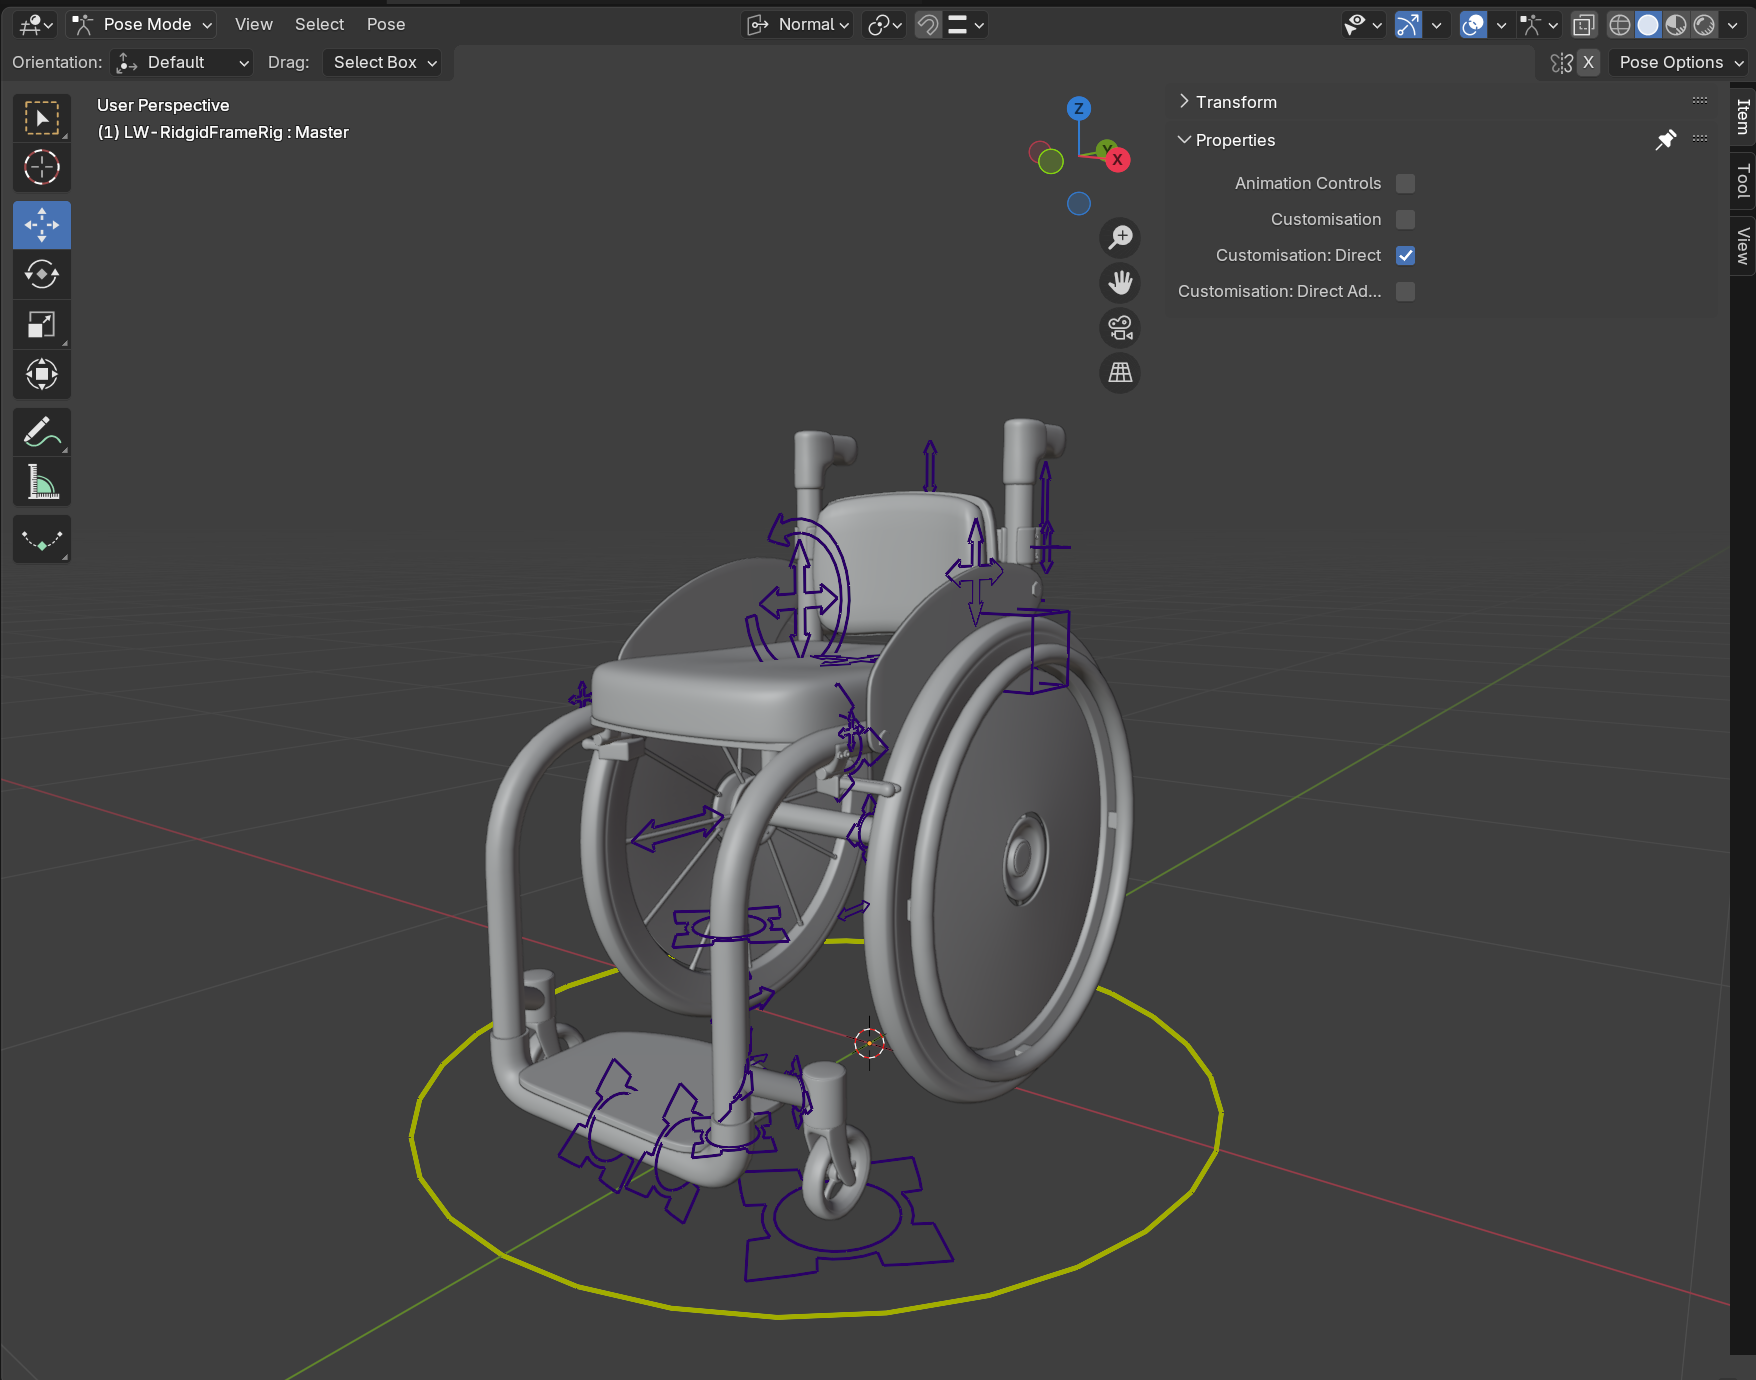
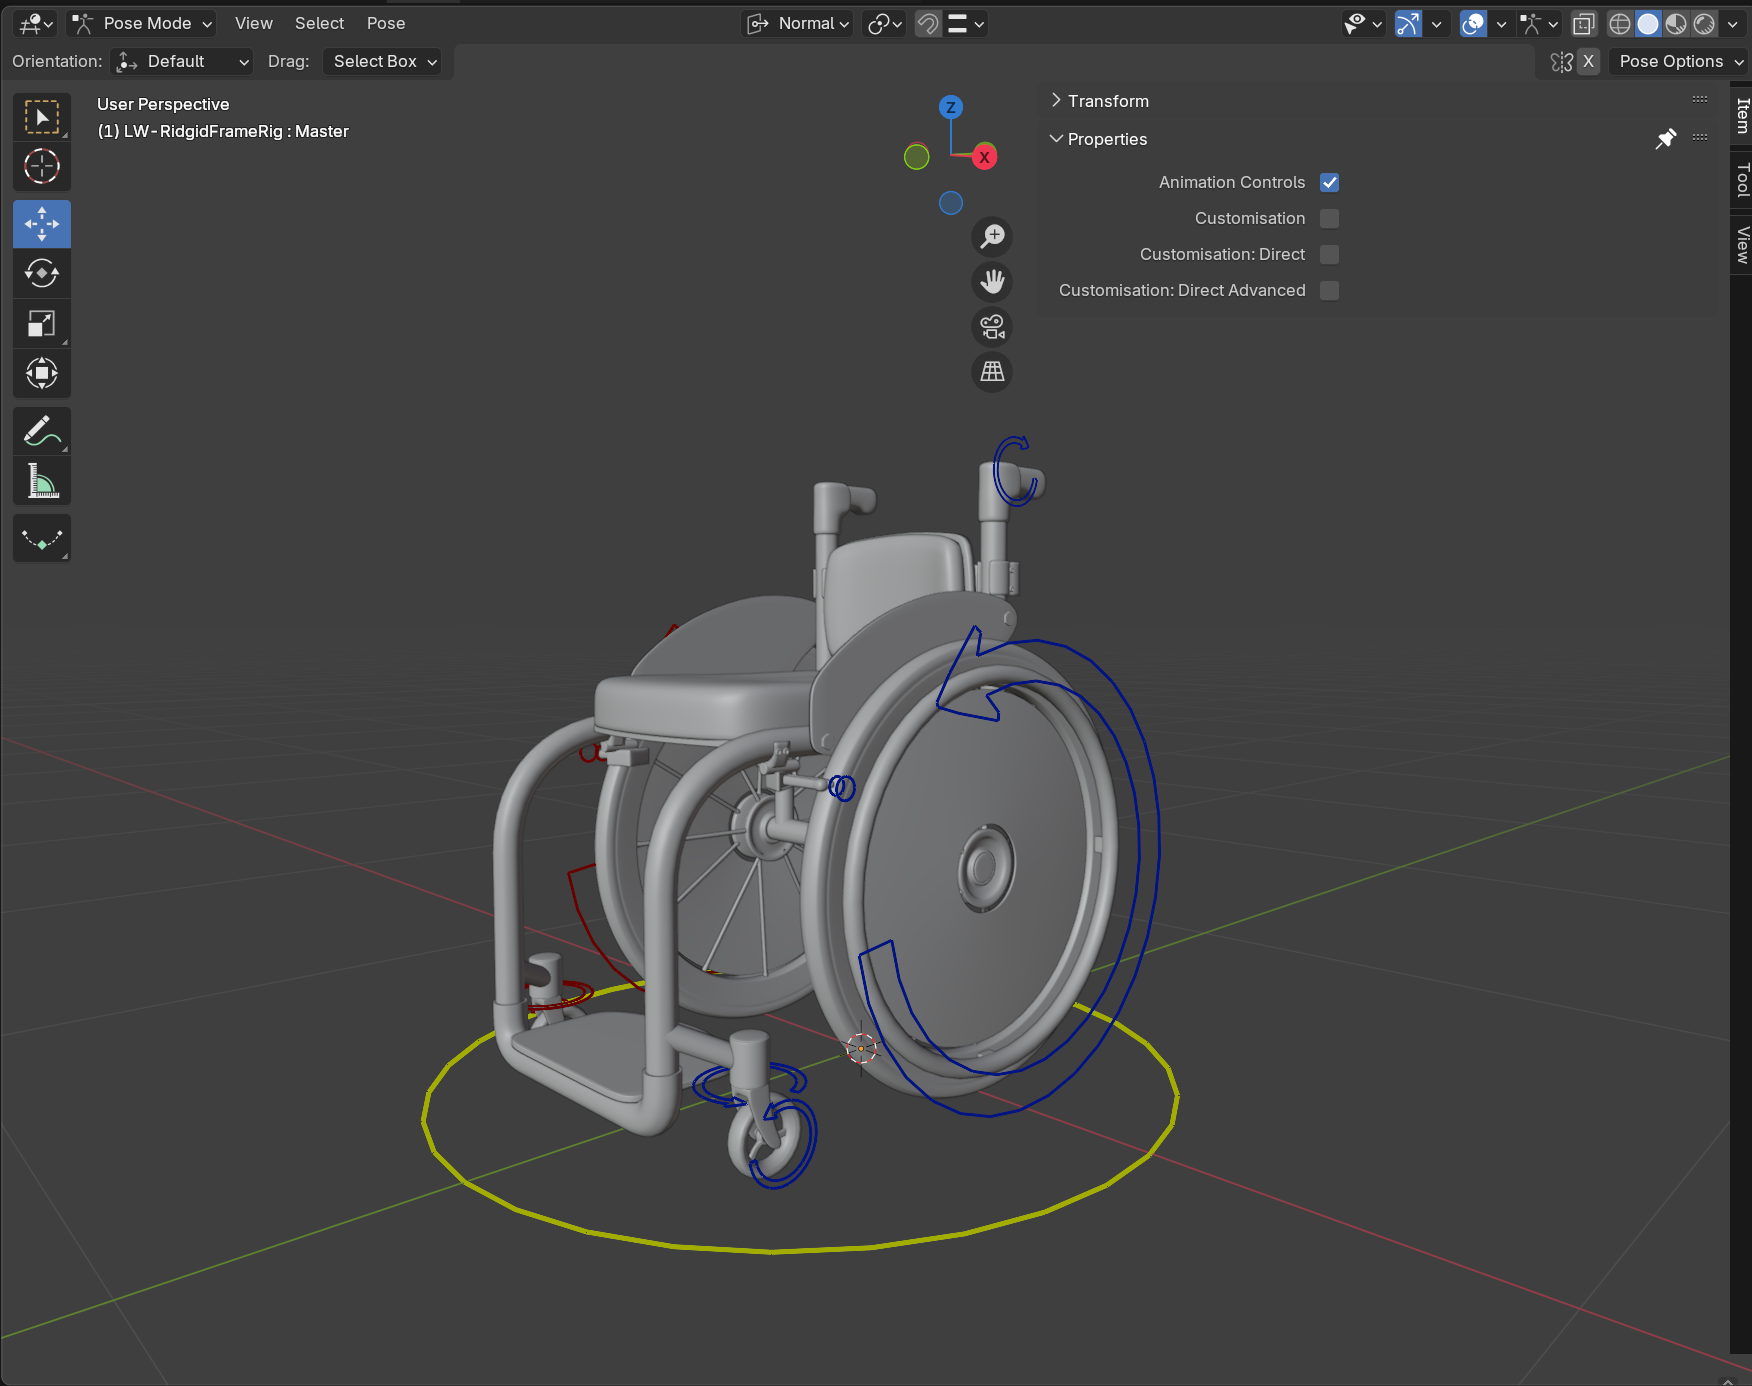
When opening the .blend file for the first time, you will see something that looks like this:

Double check that you are in “pose mode” (Found in the top left corner of the viewport). If you are not in this mode, the rig controllers will be black or orange (if you’re in object mode) or be displayed as sticks (if you’re in edit mode).
This rig has a few different control sets. To access them, use the Master Control “properties” panel. It should be open by default when you first open the file, but if it’s not, click on the Master controller (the yellow circle around the chair) and open the side panels by pressing “N” on your keyboard.

By default, only one part of the rig is enabled, the Customisation Controls, but you can enable/disabled any of the control sets by checking or checking the boxes in the Master Control properties.
The (main) Customisation Control set
The first set, and the set that is enabled by default, is the customisation control set. Think of this set of controls like the “basic shapes” of this wheelchair, they’ll help you get the overall look and feel you want for this wheelchair, and you can use some of the others to fine-tune it later on. All the controls in this set are colour-coded green, with the exception of the yellow Master Control.
Every controller in this part of the rig will morph the chair into pre-determined positions, with the exception of the paint pallet controller under the chair. By moving the controllers in the directions the arrows point to, you can make changes to the general shape and layout of the wheelchair. There are 8 in total, not including the master controller.
1. Master Controller
If you want to move/rotate the entire chair (e.g. for animation) or scale the entire wheelchair at once, use the master control to do so.
This controller is technically shared across all control other sets and is currently, including the animation control set. It is for this reason that if you need to move or rotate the wheelchair, these channels can be keyframed. The scale channels can also be keyframed, but if you change the size of the wheelchair this way, I recommend against key-framing it or it may change size while you’re animating (unless of course that’s what you want, I’m not your boss, just be sure to make a note of what the scale was, as pressing alt+s will return it to the default size. I plan to fix this in the next update).
Known bug: DO NOT Move, rotate or scale the model/rig in object mode, as it breaks the (radial) spokes.
2. Height and Length
The overall height and length of the wheelchair is controlled using the four-way arrows above the chair’s seat.
Known bug: when the chair is made as squashed as possible (length-wise) the breaks float off/through the frame.
3. width
The overall width of the chair can be controlled using the two-way arrows located above the left wheel.
4. Footplate position and size

(apologies for the jittery gif on this one)
The overall width of the chair can be controlled using the two-way arrows located above the left wheel.
5. Wheel Camber (angle of the large wheels)
The angle of the two large wheels (called wheel camber) is controlled by the two-way arrows at the bottom of the left wheel.
6. All Terrain Mode
By moving the two-way arrows in front of the left wheel forward, you can put the chair into “all terrain” mode, so that it mimics wheelchairs built to handle less-accessible environments. Doing this makes all 4 of the wheels larger and moves the castors into a better position to accommodate their larger size.
Known bug: This isn’t a bug, per-say, as most of these kinds of manual all-terrain wheelchairs in real life do not have breaks and as such, it’s a bit hard to accommodate them in this model. As such the breaks do tend to… well break more often in this mode, especially when combined with other adjustments that alter the wheel shape or size. If this happens you can either switch the breaks off (see number 9, b) or use the controls in the Direct Customisation Control Set (purple) to fix them with manual adjustments
7. Backrest height
The height and shape of the backrest is controlled using the top, two-way arrows behind the chair
8. Bucket (Seat angle)
Some wheelchairs made for people with low core stability (e.g. high-level paraplegics, incomplete quadriplegics) will sometimes have what’s known as a bucket to help keep their user more secure in the seat. You can control this on this model using the lower two-way arrows behind the chair.
9. Customisation properties
This controller doesn’t do anything if you move it around like the others, but it does have a list of properties connected to it that can help you further customise the chair. You should see these in the “properties” panel after clicking on the large green paint pallet under the chair. Just like with the master control properties, if you do not see this panel once you have clicked on the controller, press “N” on your keyboard and it should appear.
Important note: To see the effect of most of these properties, you will need to be in either material view or render view (which you can swap to by selecting the rightmost spheres on the top bar of the 3D viewport).
There’s a lot in this panel, but hovering over each of the boxes (whether they be check boxes, sliders, colour swatches or number inputs) will give you an overview of what each one does.
If you ever want to rest any of these to their default settings, right click the option and select “reset to default value” from the menu.
a) Druid mode (00_Druid Mode)
Druid mode swaps out the materials and tweaks some of the meshes to make the chair appear to be made out of wood (in turn, removing all the metal from the chair to make it usabled by D&D-style druids).I more so included this to test out another feature but it looked neat so I left it in. I hope improve it at some point in a later update.
b) Anti-tips, backbar and breaks
These three check boxes enable or hide the associated parts of the wheelchair. “Anti-tips” add a pair of small anti-tip wheels to the back (which should respond to any adjustments made to the chair using the rest of the green controllers), unchecking “backbar” removes the bar at the back of the chair, behind the backrest, and “breaks” remove the breaks.
c) Colour: Frame
Changes the colour of the wheelchair frame.
d) Colour: Frame (Chipped paint)
Creates silver patches on the chair like chipped paint
Known bug: There is almost no visible change between 0 and 0.5. This will be fixed in a later update
e) Colour: Frame (metallicness)
Changes how metalic or plastic the chair’s paint looks
f) Colour: Frame (Shine)
Changes how shiny the frame’s paint is.
g) Colour: Pushrims
Changes the colour of the pushrims.
h) Colour: Radial Spokes
Changes the colour of the spokes (only effects the default radial-style spokes)
i) Colour: Textiles
Changes the colour of the seat, backrest and the foam on the front of the chair.
j) Colour: Tires
Changes the colour of the tires
k) Colour: Wheel accents
changes the colour of the inside of the wheels, and the suspension-style spokes (if enabled)
l) Foldable handle visibility
Just like (b), enables or disables the handles on the back of the chair. Eventually I’d like to have different options to swap between for handle styles.
m) Frame thickness
Changes how thick the frame of the wheelchair is.
n) Front padding
Increases and decreases the amount of padding on the front of the chair.
o) Front padding gap
Creates a gap in the foam starting from the centre of the footplate.
p) Pushrim thickness
Changes the shape and size of the pushrims between standard round or more ergonomic grips.
q) Pushrim visibility
hides or enables the pushrims (many all-terrain wheelchairs do not have pushrims)
r) Spoke Cover
Hides or enables the spoke cover.
How to change the spoke cover design:
The default texture on the spoke cover is of the 2021 disability pride flag, but it can be swapped out for another texture easily! Included in the download file, in the “textures” folder, find “SpokeCover_DIFF” and simply overwrite it with whatever image or texture you’d like. Any image will work here, but square images work best.
If you want to create your own custom texture, I’ve provided two template files (one for clip studio paint, and one for Photoshop or other programs that can read a .psd file). Use this guide to create your own design, then overwrite the “SpokeCover_DIFF” file. You will likely need to close blender to save over the file, and you will need to restart blender for the change to take effect anyway.
s) Spoke Style
Hides or enables different styles of spoke and hub. Choose one or the other. By default, the radial spokes (bike-like) are enabled, but the checkbox underneath enables heavier-duty suspension spokes.
t) Spoke thickness
Makes the spokes thicker or thinner (radial-style spokes only)
u) Spoke number
Controls how many spokes are on each wheel (radial-style spokes only). Minimum is 6 (for some reason, any less tends to cause glitches, I’m looking into fixing that), max is 20.
Direct Customisation Control Set
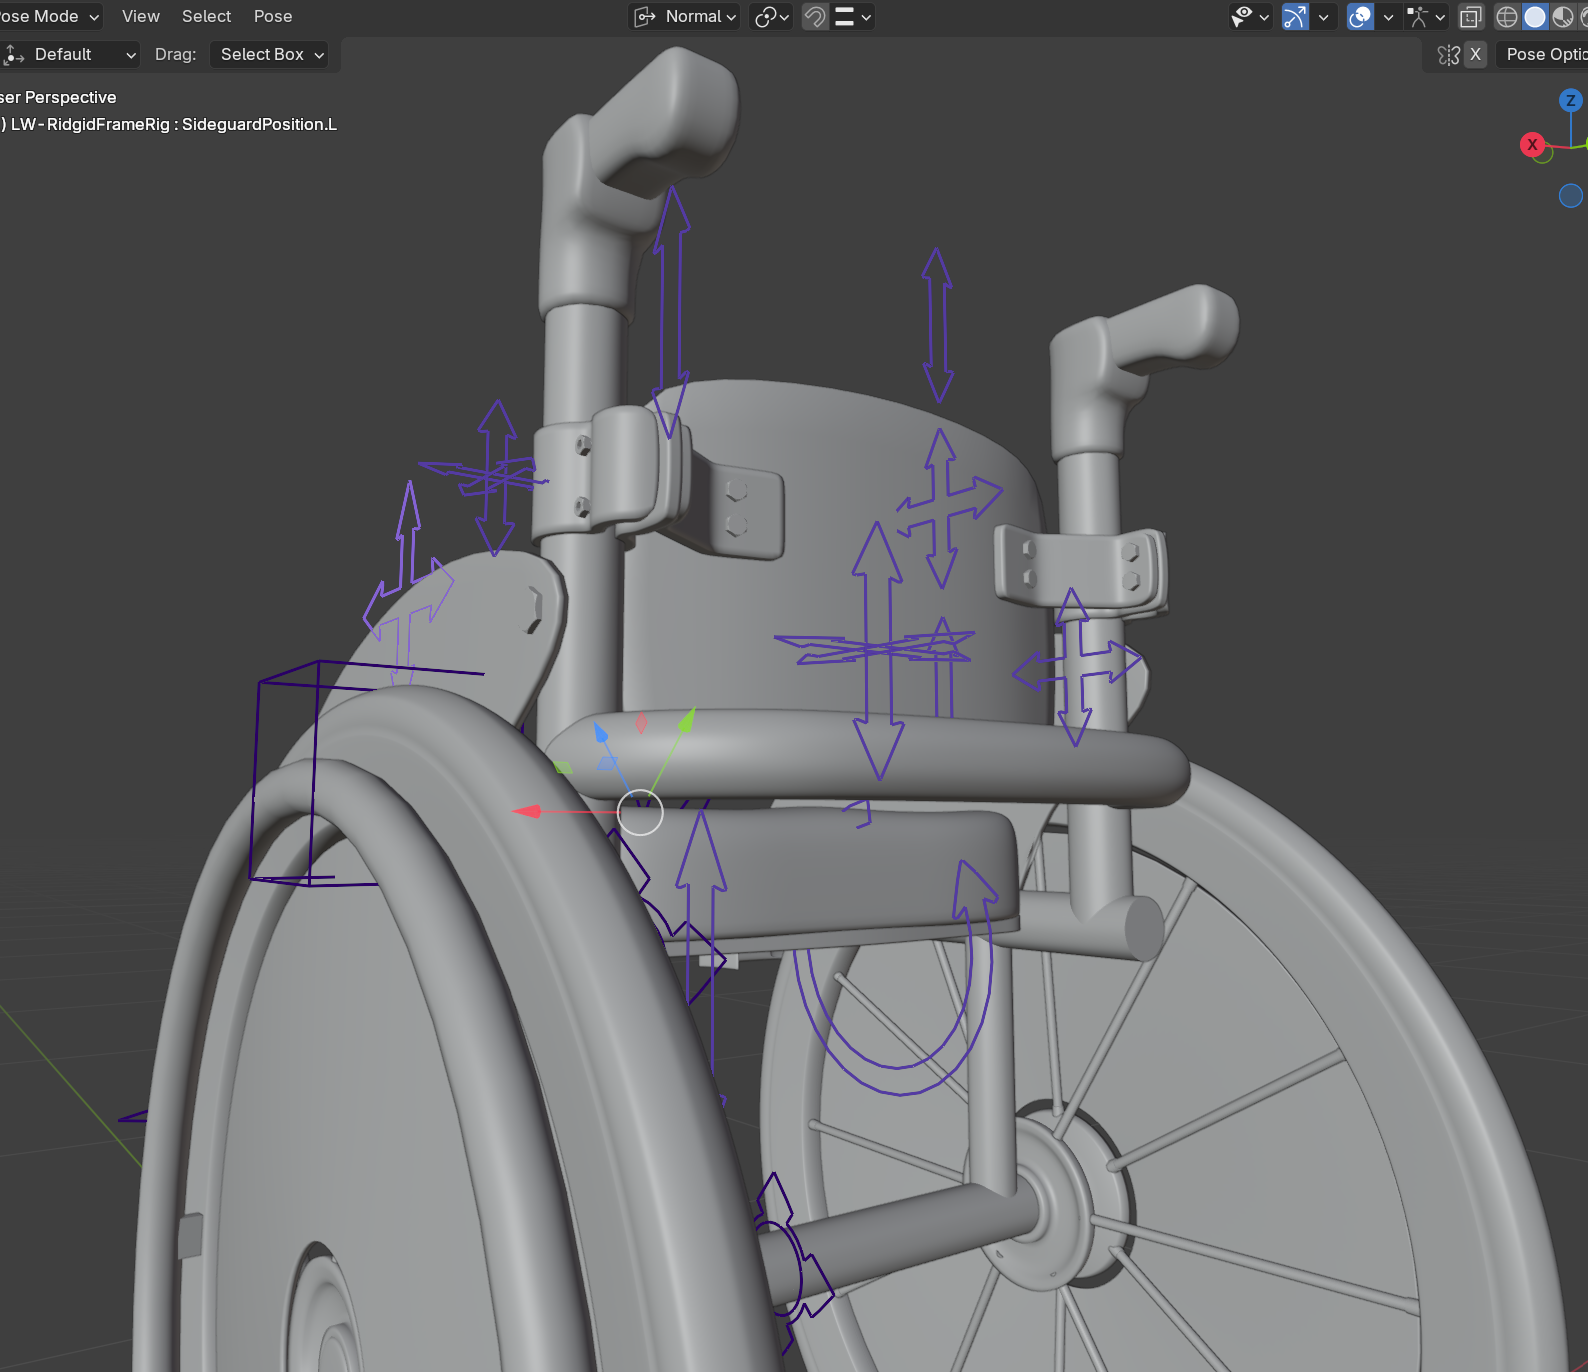
The direct customisation control set is coloured purple and is designed to be used after the regular (green) customisation controls to fine-tune the chair to suit your character or to give it a bit more personal flair.
This controller set is mirrored so any changes made to the left side with the controllers, will be applied to the other side as well.
There are 3 different kinds of controllers in this set: Directional, Frame-benders and scale controllers.
1. Directional
Directional controllers are the ones that look like arrows, and are designed to be moved or rotated in the directions the arrows point. With a few exceptions (mostly for the controllers with shape-key drivers attached) they can be moved, rotated or scaled in other ways too, however, doing this may cause other surrounding parts of the rig to break (though, most of the breaking I’ve found that occurs from this can be manually corrected using either the direct or advanced control sets)
2. Frame-benders
Frame-bender controllers are the ones that look like circles with pointed, directional arrows sticking out from them. These do more-or-less what the name implies and bend the frame of the wheelchair itself. Most of these are connected the the curves that make up the chair frame “mesh” or control the curve indirectly (such as the ones around the front castors).
These controllers can be moved, rotated and scaled in almost any way without issue. The only ones with restrictions on them are the frame-bender controls in the centre of the frame, which can not be moved on the X-axis.

3. Scale Controllers
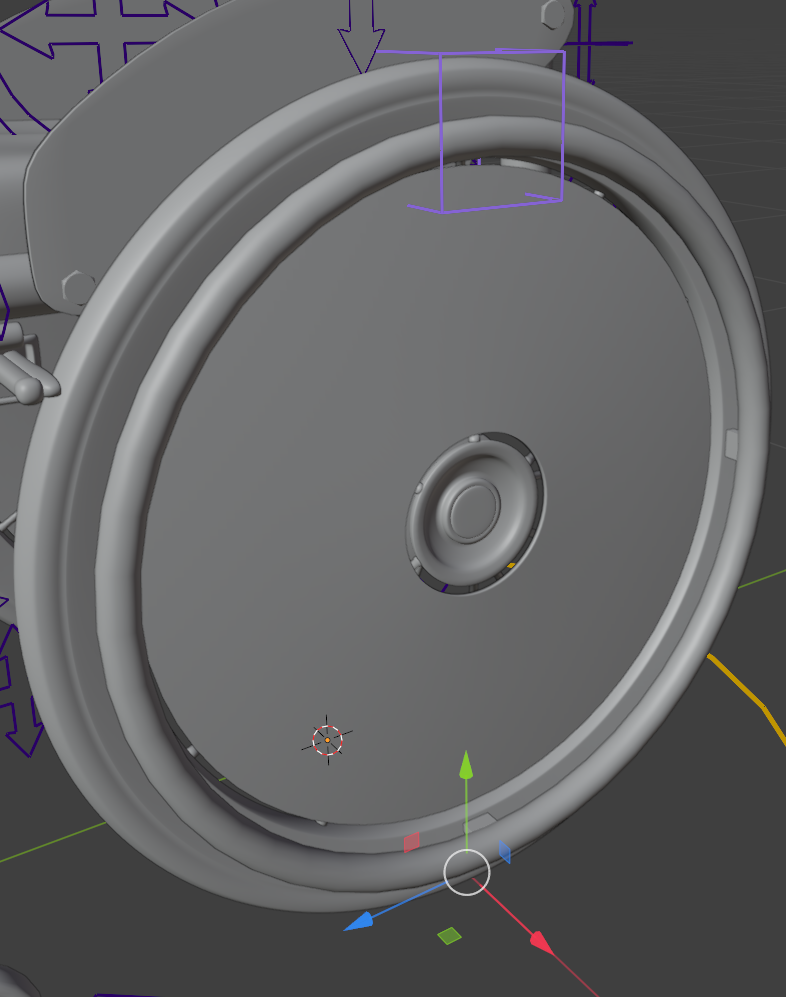
There is only one scale controller visible on this rig right now (though more may be coming soon): the cube above the wheel. This controller is designed, primarily, to be scaled without effecting other bones in the rig, though it can be moved and rotated too.
Technically, this bone is only meant to be scaled, but I have left the move and rotation channels unlocked so you can further cusomise the wheels if you so choose - though keep in mind, the controller isn’t designed to be used this way, so you will need to make manual adjustments elsewhere if you do.
if you want to manually change the camber of the wheels using this control set rather than the regular green set, in the “outliner” panel, enable “hidden bits” and select the object “wheel camber rotation point”. Hit shift+S and select “cursor to selected,” then change the pivot to “3D cursor”. Now, the bone will rotate from that top point, allowing you to change the angle easier. When you’re done, change the pivot back to “median point”.
Advanced Customisation Control Set
The Advanced Customisation Set (or direct advanced controls) is a set of extra, direct controllers meant to be used in combination with the other customisation sets and gives the user even more control to fine-tune the shape of the chair. They are coloured pink, and mostly work the same way as the direct customisation set, though it adds an extra type of controller, the “handle” controller. These are the spheres, and they typically follow the closest Frame-bender control, but they can be moved independently to make small adjustments to the frame’s shape. Rotating or scaling them has no effect.

Animation control set
The final control set is the animation controls. Once you are satisfied with the shape of your character’s wheelchair, you can disable the customisation rigs (which functionally locks the chair’s shape) and animate the actual moving parts of your wheelchair like any other rig. You’ll notice that the master control will still be visible though. Unfortunately, this controller can’t be locked, so If you have scaled this controller, when animating, try to avoid keyframing the scale channels to prevent the size of the wheelchair changing during your animation.
Known Bug: as mentioned in the Customisation Set overview, there is a known bug where the spokes will break if you move, rotate or scale the rig in object mode, so when moving the model throughout your scene, please do so by using the master control in Pose Mode
Unlike the customisation rig sets, the animation controls are not automatically mirrored, so the individual sides can be moved independently of each other. So to help differentiate the controllers, the left side of this rig is coloured blue, the right is red and the centre controllers are yellow.
Connecting a character model to the wheelchair rig
If you have a 3D model of your character who will be using this chair, you can connect them so that when the wheelchair moves, they’ll move with it. If your character model is not rigged, just parent the mesh to the Master Controller.
For rigged characters, there’s a few ways to do it, but this is the method I recommend to avoid glitches, especially if you will be using it in an animation where your character will need to get out of their wheelchair (e.g. to transfer into another wheelchair or surface, or to stand up in the case of ambulatory wheelchair users).
bring your character into the scene by going to file > append and selecting your character’s file and any objects needed by them/their rig.
OR
Import the wheelchair model into an existing scene with your character by going to file > append, then selecting the wheelchair file, “collections” and selecting everything in that folder. You’ll see some extra objects import with the wheelchair, just go to your outliner, find the folder “Hidden bits” and hide themOnce your character and the wheelchair are in the same file, make any adjustments needs to the chair for them to fit, and then swap to the animation control set.
Go back into object mode, click on your character’s rig. Click on the “object constraint” panel.
Click on “add object constraint” and select “Child of”.
Select the wheelchair rig as the target and specify the “master” control in the “bone” box.
If your character’s position changes (like in the GIF), click “Select inverse”
Now your character will also follow the wheelchair’s master controller, and will move with it. Because this is a constraint, you can also turn it off or lower the influence for when your character needs to get out of it.
Exporting the Changes to the .obj files
The .Obj file included in the download are for the default shape of the wheelchair, but if you want your customisation adjustments to be visible in other programs like Clip Studio Paint, you’ll need to export the changes and overwrite the files. You can do this by:
Going up to the box that says “pose mode” in the top left corner of the viewport and select “object mode” from the list.
All the coloured controllers should change to either black or orange. Once they have, click and drag your mouse from one corner of the viewport to the other to select all visible meshes (objects) on screen. Everything should have an orange boarder around it, this means it’s been selected.
Check that all visible objects are selected with that orange boarder. If any objects don’t have that, press shift + left click to select them manually, Anything not selected will not be included in the .obj file.
File > Export > Wavefont (.obj)
Click on the original .obj file that came with your download. If it wasn’t already, the “name” box down the bottom will have changed from grey to red. This just means you’re going to overwright that file, which is what we want.
Look at the panel on the side and make sure the following boxes are checked:
Check “Selection only”
Check “Apply Modifiers”
uncheck “materials”
Click the blue “Export Wavefront .obj” box.
If you’re running on a less powerful PC, Blender may stop responding at this point, but wait a few moments and it should unfreeze. Once it’s done, a little blue pop-up will appear briefly along the bottom bar to tell you the model has been successfully exported. You’re now ready to import the file into other programs!
Importing the models into drawing software
Included in the download folder are .obj and .mtl files, which allow the models to be used by programs other than blender, such as art and drawing software. I personally use Clip Studio Paint so that is what I will use in this section, but any program that can read 3D files should be able to read the .obj file.
If you are using a different program that doesn’t support 3D referance files, you should be able to open the .obj in most 3D model viewers, take a screenshot and import that into your art file. If you’re on PC or Mac, Blender is probably the best program to use, but other options include CAD or Online 3D viewer. On Ipads or other mobile devices, some options include 3D Viewer and Nomad Sculpt. Procreate can also read .obj files, but as these models aren’t textured, they have some UV errors, which means they will display in procreate weirdly. I will try to fix this on a later update.
Importing to Clip Studio Desktop Versions
(PC, Mac and Linux)
Once you’re out of Blender, Importing the adjustable wheelchair model into the desktop version of Clip Studio Paint is more or less identical to the process of importing the unrigged models, and since I have limited storage space for GIFs, I’m going to re-use those GIFs here, though keep in mind, this model will not import colour or material data into Clip Studio.
Extract (unzip) the downloaded folder and find the .obj file.
Open Clip studio paint and either create a new file or open an existing one.
Click and drag the .obj file onto your canvas
OR
Go to File > Import > 3D Data (M) and find your .obj file.After a moment, the model will appear on your canvas. You can also import the default human models into the same scene so you can pose them with the wheelchair. All The chairs are scaled to be a little wider than the default human models, but otherwise be roughly the right proportions (The chairs are made to be wider to accommodate the average person, and the default models are a bit thinner than that).
If you want to save the model for easier access in CSP in the future, click and drag the layer containing the wheelchair model into the Materials tab and it will save it as an asset.
Importing to Clip Studio Mobile Versions
(Ipad)
Importing the file into Clip Studio Paint on the ipad is mostly the same.
Using the “Files” app, find the downloaded .zip file, then tap and hold until a menu appears with “decompress” as one of the options. This should create a folder with all the downloaded files in it, including the .obj files.
Open Clip studio paint and either create a new file or open an existing one.
Go to File > import > 3D Data and find the .obj file inside the new folder.
A pop-up will likely appear asking if this model contains multipe files. This is asking if there is an attached .mtl file, which in this case, there isn’t, so just click no
After a moment, the model will appear on your canvas. You can also import the default human models into the same scene so you can pose them with the wheelchair. All The chairs are scaled to be a little wider than the default human models, but otherwise be roughly the right proportions (The chairs are made to be wider to accommodate the average person, and the default models are a bit thinner than that).
If you want to save the model for easier access in CSP in the future, drag the layer containing the wheelchair model into the Materials tab and it will save it as an asset.
Planned additions and updates
The following are some of the additions I’d like to eventually add or improve upon in future updates:
Add a proper menu or control panel to make the existing options easier to find and adjust.
Add alternative back rests, including a high-support back + headrest option
Add more options for side guards and arm rests
Add more handle styles
Add more footrest styles, (including a furry/digitigrade-freindly version, and the option to remove the footplate entirely)
Add optional wheel suspension
Add the option for a folding frame (Though this might need to be a separate model/rig, we’ll see).
Add power-assist modules (e.g. a rear-mounted “smart-drive”, Smart wheels, A front-mounted tri-wheel)
Add a hand-cycle add-on
Add more anti-tip wheel styles.
Add optional, customisable stickers
Add more break styles.
Improve textures and materials, while keeping the customisability.
Stop the breaks from breaking
General bug-fixes
Make the “Druid-mode” actually look more like it belongs in a fantasy setting
Make other fantasy-inspired variations.
Request a feature
Is there something you’d like to see that’s not on the list? let me know!
Known bugs and issues
There are a number of known bugs with the wheelchair and it’s rig at the moment, but I’m working to find a fix. Most have already been mentioned throughout the manual, but here is a dedicated list:
-
Moving, rotating or scaleing the Wheelchair rig in object mode will cause the Radial-style spokes to break
Cause:
This is a result of how the spokes were set up, allowing the number of spokes to be increased and the positions to be adjusted to account for the new ones added. I’m working on a fix, but it will likely mean the whole system needs to be rebuilt, so it could take some time.
Work-around:
There’s a few ways to avoid this until the problem can be fixed.
Only move/rotate/scale the wheelchair using the master controller in Pose Mode.
If you absolutely can’t avoid moving the Wheelchair in object mode, you can either swap to the “suspension” style spoke layout, or use method #3 (recommended only for those with experience using Blender already):
Once you have made all the alterations to the chair you want:
go to edit > preferences > get extensions and search for “Apply modifiers with shape keys”. Install and enable this plugin.
Click on one of the spoke meshes (there are two, one on the left wheel and one on the right, which one you start with doesn’t matter)
Go to the object data panel and find the shape keys section. Select “Basis,” click the downward arrow in the darker box (between the + and - buttons and the move shape-key buttons) and select “apply modifiers for meshes with shape keys.
Select both the “array” modifiers (Array and Array.001).
Repeat steps 3 and 4 on the opposite wheel. You should be able to move the rig in object mode now without breaking anything, but you will loose the ability to change the number of spokes.
-
Problem:
The default wheelchair breaks are temperamental at best and there’s a number of issues with them, including coming off or clipping through the frame when the length is set too low, or coming away from the frame when more than one of the green customisation controllers influences them.
Cause:
It’s caused by a few different issues all combining together. I’m aware of the issue but unsure how to fix it without limiting customisation ability of the user.
Work around:
For now, the best work around is to use the Direct and Advanced controllers to move them back into place, or hide them (using the customisation properties controller) when the wheelchair is set to an especially extreme position.
-
Problem:
The Colour: Frame (Chipped paint) option in the Customisation properties controller doesn’t have much of an effect between 0 and 0.5, which can make that box feel like it’s not doing anything.
Cause:
The chipped paint effect is a randomly generated texture controlled by a driver, and for whatever reason, the effect starts applying mostly in spots that aren’t very visible on the model. This can probably be fixed by tweaking the formula the driver is using, but I’m bad at maths so it’s taking me a while 😅
Bug report
I’ve probably missed a few bugs, so if you encounter any not mentioned here, please let me know by filling out this bug report! If I can fix it quickly, I will! If not, I’ll add it to the known bugs and issues list and try to fix it when I can!